If you’re thinking of using crepe and tissue paper for a task, you can discover motivation here to master gift wrapping and broaden your innovative accomplishments to make other masterpieces.
Unlike the thickness of cardstock, crepe paper is stretchy and sturdy enough to be used with a dry iron. In this world of crafting, anything from crepe paper carnations to tissue paper lanterns goes. There are still plenty more crepe and tissue paper projects to choose from in this collection.
A perfect first project? Paper flowers are gorgeous for any celebration and last longer than the garden-grown range. We also like that kids can participate on the fun of making them. The differing colors of paper will be distinctive, and the tasks will be easy to comprehend and amazing for crafters of any level. Another craft to contribute to your docket consists of crepe paper birds. This can knock the average paper craft out of the park with simple-to-follow steps. With any crafting job, keeping it mess-free is likewise perfect, and paper jobs definitely fit the bill. You will be without excessive shine and abundances of sticky materials, leaving you with hassle-free clean-up and prize-worthy works of art.
All of this range will allow you to utilize crepe and tissue paper to package gifts with pizzazz and also ramp up your décor in DIY style. So, pick your paper and bring your creativity to the leading edge to evaluate out your endless abilities.
01
of 10
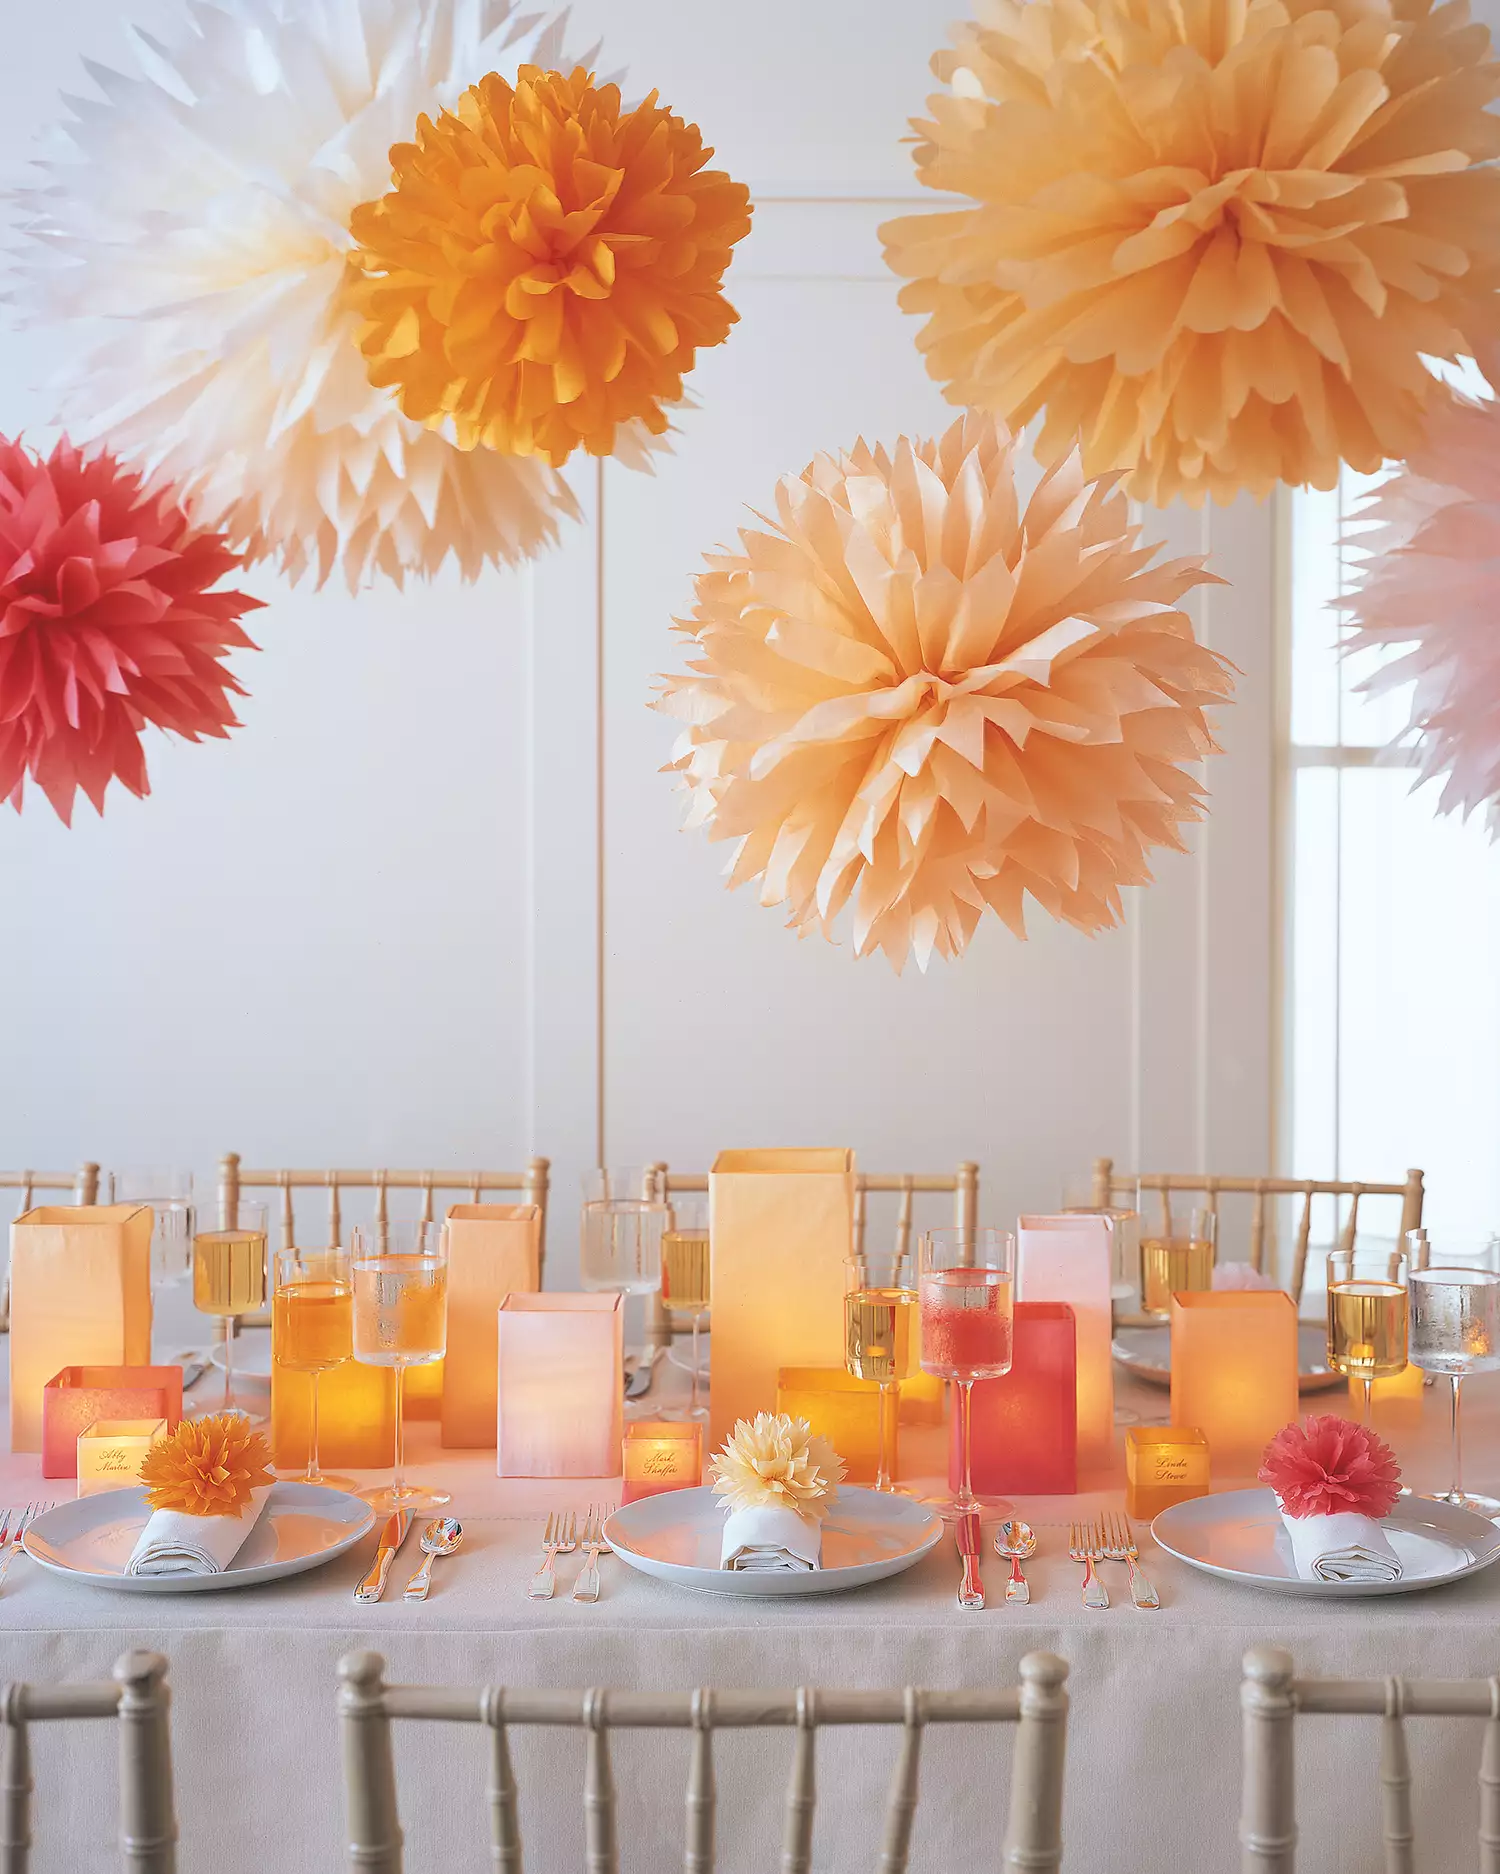
Tissue Paper Pom-Poms and Luminarias
Hosting a brunch, an infant shower, or a vacation banquet? These pom-poms and luminarias in intense hues deserve cheering about. The easy job needs only tissue paper, 24-gauge flower wire, and scissors.
02
of 10
Crepe Paper Carrots
These crepe paper carrots are basic sufficient to develop that even young kids can make them. Press end of paper down into top. Fold green crepe paper in half throughout its grain.
03
of 10
Crepe Paper Birds
Make these wildlife creations look authentic by first making the head and body: Use a glue weapon to attach a small polystyrene ball to the rounded end of a bigger polystyrene egg (for each bird, differ positioning somewhat to produce various body postures); let dry. Cut a seven-inch square of colored crepe paper. Lay the body near the bottom edge. Starting at the breast, cover the body, stretching the paper to fit the shapes as you go. Brush with ugly glue. Taper back end to develop tail. Twist front end to develop a beak; brush with glue. Trim with scissors while paper is damp; let dry. Wrap beak in brown floral tape; trim. For eyes, press in map tacks. Make wings: Tear strips of crepe paper in desired shades. Overlap strips to produce a color gradient, and glue. Cut out 2 rectangles; glue to each side of the bird. Taper ends to form wing shapes. For the breast, cut a paper oval in a contrasting color, and glue.
04
of 10
Crepe Paper Tulip
Who stated making flowers needed to be hard? This tulip craft provides a design template to get you started and requires simply six petals, a fringe endurance, and 2 elongated delegates attain the uncomplicated flower look.
05
of 10
Splashed Tissue Paper Flowers
Let your imaginative side run wild with this tissue paper task. You can include colors of your choice to make your splatter tissue paper flowers pop. Following bundle directions, assemble a few tissue paper flowers from both bundles. Fill your spray bottle with water, and add satin paint as needed; shake well. Spray your assembled tissue flowers with one color at a time. If the pump on the bottle sprays while held midway down, and not raised back totally to the top, it will launch larger drops. Don’t forget to spray the ideas of some layers beneath for included depth.
06
of 10
Tissue Paper Boa
Tissue paper boas aren’t simply fitting for the holidays. This enjoyable addition to your clothes can include style to any celebration hosted in your house. Start by cutting five-inch strips of red tissue paper (roughly 24 inches long) using a ruler and craft knife. Cut tissue paper into fringe using scissors (half inches large and 2 inches long) along both edges of the strips. Draw a bead of glue down the center of one layer of fringed tissue with the ballpoint glue pen. Do not glue all the method to the end, leave a one inch space before the end. Location a second layer on top. Continue to glue and layer with three more pieces, leaving the one inch unglued end. Repeat this procedure with another set of tissue paper. This adds length to your boa. Link the 2 sets of fringed tissue by gluing the ends (that were left unglued), and by alternating the layers from each set.
07
of 10
Crepe Paper Carnation
This carnation will look pretty enough to embellish for any occasion. Use 3 strips of petals (get the design template below), each 12 inches. Securely pleat bottom edge of one strip, then wrap it securely around itself, keeping bottom edge lined up. Secure with flower tape. Repeat with other strips. Tape bases of rolled strips to the end of a plain floral wire and to one another, wrapping tape down stem. Pull petals outward to develop a dome.
08
of 10
Crepe Paper Lotus Blossoms
These handcrafted paper creations are easy to make and will appear like fresh flowers in complete blossom. Begin by cutting 2 four-inch squares of yellow tissue paper. Stack squares, and fold in half. Utilizing fringe scissors, cut fringe along the open side, leaving fold undamaged. Move an eight-inch length of wire inside fold. Scrunch tissue paper along wire, producing a small pom-pom, the “endurance.” Fold wire in half, and twist ends together to make a “stem.” Cut pink floral crepe paper into a large rectangle, about 4 by 12 inches, with the paper grain running vertically. Utilizing routine scissors, cut “petals”: Cut into one long side at three-fourths inch periods, leaving a one-inch margin along opposite side. Without stretching crepe paper, cut rounded points at the end of each petal. Coil pink rectangle, petals up, around yellow stamen, covering it snugly however not so tight that you stretch the paper. (Try to stagger the petals so they don’t line up as you cover) Secure the pink coil with rubber band. Wrap the base of coil with flower tape, covering elastic band, then wind around wire stem. Starting with the outdoors petals, shape each by carefully extending and curving the crepe paper. Flex the petals back to open the bloom. Fluff yellow endurances with your fingertips. For the leaf, cut a five-inch square of green crepe paper, with the paper grain running vertically. Pinch the bottom edge, loosely pleating it, to make a fan shape; protect with floral tape to make a small stem. Using regular scissors, trim edge to make a rounded leaf. With your fingers, gently shape the leaf into a cup. Set it inside a round wood box together with the lotus bloom, or attach the leaf and blossom stems utilizing floral tape.
09
of 10
Crepe Paper Cookie Gifting
Vibrant crepe paper turns modest paper-towel tubes into cute containers for gifting cookies. Load little treats in parchment initially to keep them fresh, then slide them into a tube. Wrap it with paper, and seal each end with a twist.
10
of 10
Fundamental Crepe Paper Cap
Produce this traditional craft with ease by cutting a strip of crepe paper one-and-a-half inches longer than the area of the wearer’s head and double the height you desire the cap to be (our cap is 10 inches high, so we determined the crepe to 20 inches high). The grain of the crepe ought to run along the height of the cap. Fold crepe in half lengthwise; the folded edge will wrap around the wearer’s head, forming the bottom of the cap. Stitch ends together by hand or on the sewing machine, forming a vertical seam to be used at the back of the head. Cut joint allowance. Gather the top edge of the cap, either by hand or with a hand-basting stitch that you then pull to gather. Secure the gathered top by binding it with several wraps of floral tape, so it resembles a stem.